Scanning...
Recently, i have done one project: I scanned one large map (one of those which are meant to be hung on a wall for the whole class to see). Because i had problems with the technique myself, and because i couldn't find any information about this on the internet myself, i have decided to share this information for all the Net to see...
This tutorial was written for user who understands general terms in graphics and is willing to experiment with the parameters which are different to eachproject. It tries to guide through the process of joining/stitching of about 60-80 indvidual scans/pieces/parts. If you only try to stitch A3/A2 using your A4 scanner, you have to follow only steps 3 and 7
The main problem is software: i couldn't find a decent program for stitching scanned image because they don't find the correct keypoints between the images, meaning that they cannot find similarities in overlapped areas of the images, and subsequently meaning that the program cannot join the images. Realviz Stitcher, a well known program, really dissapointed me with it's one limitation: "Every image must be the same size". Because of that, scanned images i have straightened (straightening changes dimensions of resulting image) couldn't be stitched at all (it even refuses to read them when it sees this darn difference) even when they differ only in one pixel! And it is said that this program is optimized for stitching scanned images...
After all this search for programs, i gave up. I now tried to configure my primary stitching program - Autostitch... It worked, but i spent really much time configuring it to work correctly. Now all the following stuff seems basic to me, but i know that absolute majority of people don't even know how is it possible to scan objects of such size, and how you can do that with standard A4 scanner. This process can be broken to 7 parts:
1. Scan the whole thing in overlapping rows (really preferably saving each row in a separate directory eg. Row1, Row2)
2. Download AutoStitch from here
3. Batch process 1 row (convert TIFFs to JPEGs, and rotate them 90º to left)***
4. Configure Autostitch to these parameters: screenshot and feed the 1st row source images to Autostitch for stitching. It will be saved as pano.jpg at the directory where pictures are located
5. Repeat third and fourth steps until rows are depleted. Use the same Autostitch configuration for each row
6. Batch rename all of pano.jpg's (batch processing is preferred because it is really boring work to rename them one by one with mouse and keyboard) to DSC01.jpg, DSC02.jpg (or something like that) and move them to a directory called "rows"
7. Now, select the contents of the folder "rows" and stitch them (it will refuse to do that if you didn't rename pano.jpg's and left them pano.jpg, pano2.jpg). See note about parameters if problems occur.
*** I assume you scan in vertical pieces (text flow like in normal portrait A4 paper)
****
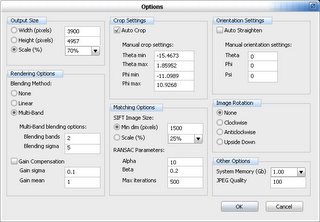
Scaling usually does not matter when you're joining only some images; but you'll probably have to adjust it when doing the final stitch. SIFT image size is sometimes useful to adjust for precision; But usually you can leave it intact
note about parameters: autostitch is a bit tricky to setup: you have to keep track of almost every parameter. Because of that, i have included screenshot(s) of preferences window. An item worth noting is size: if you use a value too high, you may end up with an error message "out of memory" or, more likely, with unfinished output image. "Out of memory" is most likely to occur when you're doing the step 7. That means you'll have to precisely set the output size so that it isn't too big.
note about performance: to do all this with really large maps, you'll need at least 256MB of RAM in your computer (really minimum for such images). I used 1GB for this project, but 512MB is acceptable too.
posted by Karolis Lyvens at 18:08
![]()

1 Comments:
Thanks so much, you have saved me so much time and frustration in joining A3 scans together from an A4 scanner.
great work!
Post a Comment
<< Home